Overview
Manage your accounts, schedule transfers, deposit checks and more all without having to visit a branch.
Get StartedDIGITAL BRANCH
Manage your accounts, schedule transfers, deposit checks and more all without having to visit a branch.
Get StartedThe first time you log in, we’ll help you confirm or create your username and password. It takes just a few minutes and may require a little bit of personal information so we can confirm your identity.
Get StartedWith the Digital Branch’s Bill Pay feature, you can make payments to companies and other people directly from your accounts without writing checks or needing cash.
Get StartedLet us alert you to activity on your accounts and more. On your terms.
Get StartedIn this demo, you'll look at how to link external accounts to your Digital Branch dashboard.
Get StartedIn this demo, you'll learn how to find your eStatements on your desktop computer.
Get StartedLearn how to keep your Dashboard tidy by hiding accounts you don’t wish to view
Get StartedLearn how to export your account history for use in accounting software
Get StartedLearn how to make transfers between accounts using your desktop mobile devices.
Get StartedLearn how to make transfers to other iQ members, and add external accounts to your digital branch.
Get StartedLearn how to transfer money between accounts on the iQ Digital Branch mobile app.
Get StartedIn this demo, you'll look at how to deposit a check using your mobile device.
Get StartedLearn how to create a savings goal and monitor your progress in the Digital Branch.
Get StartedLearn how to use the Digital Branch to create a budget, assign categories to transactions, see how you’re doing each month at a glance and make real-time adjustments.
Get StartedLearn how to set up distinct roles for your business accounts, with permissions and account access appropriate for each employee.
Get StartedThe first time you log in, we’ll help you confirm or create your username and password. It takes just a few minutes and may require a little bit of personal information so we can confirm your identity.
Get StartedThe Dashboard functions as a centralized location for your Accounts, Alerts, Recent History, Upcoming Activities, Promotions, and more.
CloseView your account balances at a glance in the “Accounts” panel. To customize, add, or remove accounts from the dashboard, click the gear icon.
CloseThe Primary or Secondary Account Indicator icon shows whether you are the primary or secondary owner on an account. This is important because your actions may be limited within the account if you are not the primary account holder.
CloseA quick glance at your recent account activity can be found here. You can modify the date range and type of activity you wish to monitor by clicking the Settings icon.
CloseGet help at any time by clicking the Help button. The details that display will be specific to the Widget you are using.
CloseCustomize your account views, change your notifications, upload a profile picture and more in the Settings menu.
CloseAdd an image, set a nickname, and view your recent login activity from the profile tab.
CloseChange your password, manage remembered devices and set your security questions from the “Security” tab. Here you can set two-factor authentication settings for an extra layer of security. Enable a code to go to either via email or SMS text message to the number you have on file.
CloseChange the look of your Digital Branch by selecting from the range of options available in the “Themes” tab.
CloseChange your contact information, including email, phone numbers, and address from the “Contact” tab.
CloseAdd or remove widgets linking to the services you use often from this panel. You can also reach this panel at any time from the “Widget” menu item to the left.
CloseView all of your accounts and edit their details, including giving them a nickname, an identifying color, or choose to hide them in the dashboard.
CloseCommonly used widgets are called “Favorites”. You can modify these by adding or removing widgets from your dashboard in the Settings screen. Select your favorite widgets to be displayed on your dashboard by clicking the star to the right of the description.
CloseThe Accounts widget provides quick access to view transaction history and customize your accounts in the Digital Branch.
CloseThe Transfers widget offers quick, 3-click transfers between your accounts, plus access to schedule transfers, transfer to another member and set up transfers to and from accounts or loans at other financial institutions.
CloseClick "More" to access other widgets offered through the Digital Branch. Some of the widgets we haven’t talked about yet include Budgets, Savings Goals, Check Services, eStatements and more.
CloseYou’re now ready to start adding employees, partners and co-owners to your Digital Branch!
CloseIn this demo, you'll look at examples of the following:
Follow these instructions if you currently use online banking and are the primary account holder on at least one of your iQ accounts.
What you’ll need to register:
Your existing username
Hint: Going forward, you will have one designated username to access all the accounts that are associated with your uniQue identifier.
CloseFrom the login screen, enter your existing username. Click “Log In”.
CloseTo gain access to the Digital Branch system for the first time, enter the temporary password based on your personal information (primary members only).
CloseNext, create a strong, unique password at least 8 characters long, including at least one lowercase character, at least one number, and at least one special character. Enter it again to confirm and click “Continue”.
CloseReview the Digital Branch Service Agreement terms and conditions in order to proceed. When finished, check the “I agree” box.
CloseStart your new Digital Branch banking experience. Complete your profile, view your accounts, and customize your settings.
CloseFollow these instructions if you are new to online banking or are a joint account holder on your iQ account.
What You’ll Need to Register
From the login screen, click “Register” to create your unique online banking username.
CloseNext, choose to register as either an Individual or Business depending on the type of account(s) you have with iQ.
CloseReview the Digital Branch Service Agreement terms and conditions in order to proceed. When finished, check the “I agree” box.
CloseConfirm your identity by entering your information into the required fields. Click “Continue”.
CloseEnter a username using only letters and numbers, and check availability to see if it is available. Next, choose how you would like to receive a temporary password and click “Continue”.
CloseYou will receive the temporary password via the method selected. Click “Continue” to have the password sent. When the password arrives, enter it into the field and click to log in.
CloseNext, create a strong, unique password at least 8 characters long, including at least one lowercase character, at least one number, and at least one special character. Click “Continue”.
CloseStart your new Digital Branch banking experience. Complete your profile, view your accounts, and customize your settings.
CloseFrom the Payments tab, you can start the payment process and view any pending or processed payments.
CloseThe Payees tab shows you a list of the people or companies you have set up to make payments to.
CloseThe Pay a Person tab lets you start the process of sending money directly to a person.
CloseThe Calendar tab shows your past and upcoming scheduled payments in a calendar format.
CloseThe My Account tab provides links to edit the accounts available to make bill payments from, and to edit your personal account information
CloseYou can choose from a list of popular payees to save time, or enter the payee name and click “Add.”
CloseAdd the payee information, including account or invoice information and click “Next.”
CloseEnter any additional information required about the payee and select an account to make your payments from.
CloseThe payee will be available in your payees list. You can make a payment now or schedule one for a later date from there, or from your Bill Pay dashboard.
CloseTo make a payment, select the account you want to pay from. Then enter the amount and payment date and click “Pay.” You can also schedule recurring accounts to automatically pay regular amounts that occur regularly by clicking “Make it recurring” and setting the date and frequency you want to make automatic payments.
CloseTo send money directly to someone, from select the “Pay a Person” tab. There are three different ways to send money.
CloseTo send money with just an email address or by text message, choose the Email or Text Message (Electronic) option. Fill in the payee information, including their email address.
CloseNext, create a keyword. Your payee will use this keyword to access a secure website and enter their account information, so it’s important to share the keyword with your payee as soon as possible.
CloseFor security purposes, a one-time activation code is required before you can send money to your new payee. Choose a method to receive the code. Once you retrieve and enter the activation code, the payee will appear on your dashboard and you can begin sending money to them. Remember, you won’t be able to send money until the payee completes their part of the process. They will receive an email with information, including a link to the secure website. There, they will use the keyword you created to log in and enter their account information.
CloseYou can also send money by direct deposit or check. To send by direct deposit, you’ll need the routing and account information for your payee’s account. To send a check, you’ll just need an address.
CloseMember will only be able to pull this information on the desktop SSO. They will need to log into Bill Pay then navigate to Payments > Pending View more > Transactions > History prior to 3/11/20
CloseNow you’re ready to start paying bills and people with Bill Pay on the Digital Branch!
CloseIn this demo, you'll look at examples of the following:
Find the dropdown menu located near your name in the upper right and choose “Settings”.
CloseClick the pencil icon next to the phone number you want to use to receive text notifications. The Digital Branch uses a double confirmation code process for security, so you'll need your security questions or access to your email and your phone to complete this process.
CloseCheck the box to confirm that you want to receive SMS Text Messages and click the button to “Send a code via text.” The system will show a "Not Confirmed" message for phone numbers that haven't been verified yet.
CloseBefore the system will send a text message, you must first verify your identity. You can do so by requesting a code be sent to your email or by answering two of your security questions and clicking “Verify.”
CloseWhen the code arrives on your phone, enter the number provided and click “Confirm code” button.
CloseFind the dropdown menu located near your name in the upper right and choose “Settings”.
CloseThe Notifications tab displays a list of alert options. For each alert type, icons indicate which delivery method(s) you have enabled (text message, email and push).
CloseTo start receiving account alerts, click the gear icon on the row associated with the alert you wish to enable.
CloseSwitch the toggle to “On” and Click “Select Accounts” to begin setting up alerts for your accounts.
CloseOn the “Balance Alert” panel that opens, Enter a high and/or low balance threshold for the accounts you wish to receive alerts for. Click “Save” when you’re finished.
CloseSelect your desired notification method for the alert by clicking the appropriate checkbox. If you’ve added a mobile phone number and opted to receive SMS text messages or have an email address listed for your accounts in the "Contact" tab, you can select one or both here. Click "Save Changes"
CloseTo disable alerts, select the gear icon and switch the toggle to the OFF position. Save Changes.
CloseIn this demo, you'll look at how to link external accounts to your Digital Branch dashboard.
Before you begin, you will need the full account and routing number for the external account you want to set up.
CloseFind the dropdown menu located near your name in the upper right and choose “Settings”.
CloseYou can add accounts from other institutions to view the balances and transactions within those accounts or add an account with access to make and receive transfers to an iQ account.
We’ll cover how to link accounts for view access first.
CloseEnter the account information for the account from which you would like to make and receive transfers. Click “Save.”
CloseReview the overview of the account linking process and security measures and click “Get Started.”
CloseSelect your financial institution from the list of popular ones or use the search box to find it.
CloseEnter the account login information for the account from which you would like to make and receive transfers. Click “Submit.”
CloseYou’ll be prompted to verify your identity using the method you have set up with the other financial institution.
CloseInformation about your accounts will appear in the Accounts panel along with your iQ accounts.
CloseTo add an external account for transfers, from the “Classic Transfer” screen, click on “Add an External Account”.
CloseReview the ACH Service Agreement terms and conditions in order to proceed. When finished, check the “I agree” box and click “Continue.”
CloseEnter your account details for the external account you’d like to add. Click “Save”.
CloseYou’ll be prompted to verify your identity using the method you have set up with the other financial institution.
CloseiQ will send two micro-deposits to the external account you wish to add which can take up to three business days. Click "OK" to continue.
CloseOnce you receive the deposits in your external account, make note of the amount of each one.
Then login to the Digital Branch, go to the Settings widget, click on the Accounts tab and find the external account that is pending confirmation. Click “Confirm”.
CloseEnter the amounts that were deposited in your external account into the confirmation panel. Click "Confirm."
CloseOnce your external account is confirmed, it will appear in your list of accounts with an “Open” icon.
CloseIn this demo, you'll learn how to find your eStatements on your desktop computer.
CloseLogin to Digital Branch.
From your Dashboard look for the eDelivery Document widget, if you do not see the eDelivery Document widget, follow the next steps. If you do see the eDelivey Document widget, skip to step 5.
CloseActivating eDelivery Documents widget – from your Dashboard, click on the … More widget then choose Widget Options.
CloseThe Settings menu will appear, the Widgets tab lists all the available widgets. You may choose which widget you want to see in your dashboard by clicking on the star icon to mark as your favorite. You may have up to five widgets showing on your dashboard. You can also reorder your widgets or hide widgets.
CloseClick on the eDelivery Documents widget located on the left side of your Dashboard
CloseOverview tab – this is where you can see if you are subscribed to receive electronic statements, account notices and tax documents. You may also subscribe from here.
CloseStatements tab –this is where your electronic account statements are located. You can filter for a data range and which iQ member account you want to view. Any account that is associated with your unique identifier as the primary account owner will be listed in the ‘Account’ drop down feature. To view your statement, simply click on the statement you would like to view. A window will open, from here you can download or print your statement.
CloseCredit Card Statements tab – this is where your iQ Credit Card statements are located. You also have filtering, account viewing, downloading and print options the same as for account statements here.
CloseNotices/Letters tab – this is where you can view important account notices that are sent to you about your account. You also have filtering, account viewing, downloading and print options the same as for account statements here. If you receive an email message from iQ that you have an important notice to view, this is the location to view those notificatons.
CloseTax Documents tab – (screenshot) this is where you can view your tax documents reported by iQ. You also have filtering, account viewing, downloading and print options the same as for account statements here.
CloseIn this demo, you'll look at examples of the following, first for desktop, then within the Digital Branch mobile app:
To make a one-time transfer between your iQ accounts, choose the Quick Transfer Tab.
Select the account you wish to move money from, choose an amount (or enter a custom amount), and select the account you want to receive money. Details will appear in the panel at the bottom of the screen. Click “Submit Transfer” to proceed.
Review information on the Confirm Transfer screen that displays, then click “Confirm Transfer” to complete the transaction.
CloseFor more options, including the ability to send money to other iQ members and schedule recurring transfers, choose the “Classic Transfer” Tab or link.
CloseSelect the account you want to transfer from via the account options listed in the From section. Your selected source account information and the available balance are visible.
CloseChoose the destination for your transfer via the account options listed in the To section. Your selected destination account information and available balance are visible.
CloseEnter an amount that you want to transfer or choose a pre-selected amount for loan or credit card payments.
CloseTo repeat a transfer on a schedule, select how often this transaction should take place, using the date you entered as the start of the series.
CloseSelect when you want this transfer to stop. You can select “Never”, enter a specific date, or the number of total transfers you want to complete. Click “Submit.”
CloseIf you like, make a note to yourself to remind you of what the transfer is for or who it’s being sent to.
CloseReview information on the Confirm Transfer screen that displays, then click “Confirm Transfer” to complete the transaction.
CloseTo see your scheduled transfers, click the “Scheduled” tab. You’ll see a calendar with dates of upcoming transfers indicated by a dot as well as a list of upcoming activity below.
CloseTo stop or edit a recurring transfer, from the “Scheduled” tab, find the transfer you want to stop and click the trash can icon. To edit, click the pencil icon.
Please note: You may only edit a scheduled transfer before the first start date has begun. Otherwise, you must delete the transfer series and create a new one.
CloseYou can view previous transfer activity by selecting the “History” tab. Click the small arrow to the far right of each row to see details about the transaction.
CloseIn this demo, you'll learn how to:
To transfer money to another iQ member, click the link to “Transfer to another iQ Credit Union member”.
CloseEnter the required member information for the person you want to transfer money to. You can choose to save the account for future use if you send money to them often by checking the box. Click “Save.” Once approved, the account will be available in your transfer accounts panel.
CloseFrom the “Classic Transfer” screen, click on “Add an External Account”.
CloseEnter your account details for the external account you’d like to add on the “Add Account at another bank” screen. Click “Save”.
iQ will send two micro-deposits to the external account you wish to add which can take up to three business days. Once you receive the deposits, go to the Settings widget, click on the Accounts tab and confirm the external account. Once confirmed, the external account will be available in your transfer accounts panel.
CloseIn this demo, you'll learn how to transfer money between accounts on the iQ Digital Branch mobile app.
CloseSelect the source of the funds you want to transfer from via the account options listed on the Choose From Account screen.
CloseSelect the destination for your transfer via the account options listed on the Choose To Account screen.
CloseTo set up recurring payments, set the frequency and select an end date.
CloseFrom the activity tab, you can tap a recurring transfer series and skip the next scheduled transfer or cancel the series via the mobile app.
CloseIn the Digital Branch Mobile App, open the menu and choose “Deposit Check”.
CloseThe first time you use the mobile deposit tool, we’ll ask you to agree to the terms of using the service.
CloseTap the Deposit Account field to select the account you’d like to deposit into.
CloseOnce you’ve selected the account, enter the amount of the check you’re depositing.
CloseSelect “Check Front” to take a photo of the front of the check you’re depositing. Align your check in the photo frame provided. The app will capture the image when all the information is legible and within the frame. Repeat for the back of the check.
CloseWhen both the front and back images have been captured and the deposit is ready, click “Deposit Check.” Your check will be processed and, if you’ve set up deposit notifications for that account, you’ll be notified when the amount is posted.
CloseIdentify the Savings Share you’d like to assign a goal to and click “New Goal”.
CloseGive your goal a name, assign a category and enter the amount you’d like to save. You can even add an inspiring image as well as the date you’d like to make your purchase. The system will do the math for you to determine how much you’ll need to save each month to meet your goal. When you’re ready, click “Save Goal”.
CloseOnce you’ve met your goal, click "Spend Funds" to transfer your savings into an account where you can make the purchase.
CloseEnter the amount you want to transfer and the account to send the money where you can spend it. Click “Transfer Funds.”
CloseWhen the transaction is complete, make sure to delete the goal or the system will continue setting aside funds for it.
CloseAssign accounts to your budget by selecting the checkbox to the left of the account(s). At least one account must be added to the budget in order to move forward.
CloseClick Add a Category in the Expenses section. Select Expense categories from the drop-down list and enter the amount you want to assign to each category. Continue to select the Add Category button to add as many or as few categories as you’d like.
CloseClick Add a Category in the Income section. Choose from the list of income categories and enter an amount in the field next to it. Select Manage Categories to create your own category.
CloseTo create additional budgets, select the Settings tab, click on the drop-down menu, and select “Create New Budget”. You can set up as many budgets as you’d like, however only one budget may be assigned to each account.
CloseFrom the Budgets widget, click on the “Transactions” tab. Click on the Category field assigned to any transaction, a drop-down menu will display. Select the category you want to assign to the transaction by clicking on it. The new category will display next to the transaction you modified.
CloseSelect the checkboxes to the left of each transaction entry to edit more than one transaction. Choose “Edit Selected” to categorize of all the selected transactions. Click “Save.”
CloseThis screen displays any alerts you may have set up for your budgets as well as a list of budgeted accounts and their balances. In addition, it captures your total budget progress for the current month based on the spending and income amounts assigned. Click “View Income” or “View Spending” to take a closer look at your monthly progress.
CloseTo see how your spending aligns with your budget expectations, select “Spending”.
CloseYou can compare months by using the date slider to select a previous month’s activity or select “Range” to view several month’s activities at once.
CloseQuickly jump to the budget transactions screen by clicking on a budget category. From there, assign categories to your transactions.
CloseBefore setting up any users, you will need to create one or more business roles. For example, you can create a role called “Co-owner/Partner” or “bookkeeper,” or “CPA.” Roles allow you to set the permissions and transaction limits for individual users and additional online banking users. Click the “Roles” tab to add your first role. Then click “Add a Role.”
CloseChoose a name and description for the new role, then click “Create Role.” For example, create a role called “Co-owner/Partner” or “Office Manager,” or “Accountant-View Only.” Later, you will assign them specific account access and dollar limits, based on their specific needs in helping you manage your business banking – decreasing account risk and better enabling each employee or partner precise contact with your business funds .
CloseEdit the permissions for the role to enable Digital Branch features such as viewing statements, and creating and initiating wires and money transfers. Click the pencil icon at the top of the Permissions section to assign permissions to the Role.
CloseCheck the boxes next to each permission you wish to enable for this role. Click the icon at the top of the Permissions section to see a definition for each.
CloseYou have the option to choose which shares and loans on the account are visible to your authorized users, and what the user may do with them. Click “Add Accounts” to begin assigning accounts to a role.
CloseCheck the box next to each account access permission you wish to enable for this role, then select “Choose Accounts.”
CloseSelect the accounts you would like this role to have access to, then click “Assign Accounts.”
CloseAfter you first assign accounts to the role, you may click on the pencil to add or limit access to accounts or edit the account permissions on individual shares or loans.
CloseIf this role has the ability to create transfers or send wires, you will need to set transaction limits for the role. Click “Edit Limits.”
CloseAn “Authorized limit” is the amount a user may transfer without receiving an approval. The “Max limit” is the maximum amount they are able to submit to be approved. If the user has permissions to approve transfers, to limit risk, you may set a transfer limit using the “Can authorize” row.
CloseAfter you have set up a role (Eg. Bookkeeper or co-owner) you may now create and add individual users, assigning them to the role you just created. This final ADD A USER step will allow your bookkeeper/employee/co-owner access to the Digital Branch. When you’re ready, click the “Users” tab, then select “Add a User” button.
CloseFill in the User’s information. Assign a username (must be at least 8 characters, letters and numbers only) and select one of the roles you set up. Once you submit the form, a temporary password will be sent to the user. Make sure you let your new user know their username.
CloseNow that you’ve set up specific Roles to help you manage your business banking, and you’ve assigned specific people and employees to those Roles, if needed, you may edit each User’s contact info, change their role as your business banking needs change, and you can re-set their security info and re-set passwords.
CloseYou’re now ready to start adding employees, partners and co-owners to your Digital Branch!
CloseIn this demo, you'll look at examples of the following:
Follow these instructions if you currently use online banking and are the primary account holder on at least one of your iQ accounts.
What you’ll need to register:
Username: "iQ" and your full member number. EX: iQ1234564321
Hint: Going forward, you will have one designated username to access all the accounts that are associated with your uniQue identifier.
CloseFrom the login screen, enter your existing username. Username: "iQ" and your full member number. EX: iQ1234564321. Click “Log In”.
CloseTo gain access to the Digital Branch system for the first time, enter the temporary password (Last six digits of your TIN/EIN + last four digits of your member number.) EX:1234564321
CloseNext, create a strong, unique password at least 8 characters long, including at least one uppercase character, at least one lowercase character, at least one number, and at least one special character. Enter it again to confirm and click “Continue”.
CloseReview the Digital Branch Service Agreement terms and conditions in order to proceed. When finished, check the “I agree” box.
CloseNote: Only domestic payees may be added. International wires cannot be scheduled in Digital Branch.
CloseBeing part of the iQ community is more than just having a reliable place to park your money. We are a local financial institution for Pacific Northwesterners seeking a uniQue banking experience. Our plaidiness is woven into the fabric of our local community, but we’re with you – wherever you go.
So no matter if you’re on the trail or getting a quick bite during a break, you can check your balances, pay bills or transfer funds anytime, anywhere – and rest easy that all is safe and secure.
Use your mobile device to pay in stores and apps. No card needed.
Scan checks from your computer or smartphone and make deposits remotely.
Receive alerts on your account balance, and monitor suspicious transactions.
Make fast payments and secure transfers between your accounts or friends and family.
Easily update your email, phone and address, and let us know you're traveling
Get the status of your application, speed up the processing of your loan.
Pay bills quickly and easily and receive alerts when bills come or when they are due. You never have to miss a payment again.
Set up your own custom Dashboard with at-a-glance views of your financial picture. You can even add non-iQ accounts to keep everything in one spot.
Keep on track with monthly FICO scores.
We’re serious about your business – because it’s our mission to make the PNW a better place to live, work and bank. And while we love to see you in person, with our new Digital Branch you’ll be able to do a lot more without visiting a branch – giving you more time to manage your business.
Navigate your financial journey with confidence and access real time account info.
Receive alerts on your account balance, get reminders about upcoming bills, and monitor suspicious transactions.
Control access for additional users.
All business account members will need to know your TIN/EIN and your member number in order to register. If you don't have your member number, please contact us at 360.695.3441.
Whether your walkabout is through a selection of local food trucks or a trek around the globe, our mobile app makes it easy for you to do you. With added security and a faster ride, your new Digital Branch uses fingerprint, touch ID or face ID. Upload a unique profile photo and you’ll always know you’re in the right place.
Icons made by Pixel perfect from www.flaticon.com
If we didn't answer your question here or in the How-to Guides above, please give our Member Contact Center a call at 360.695.3441.
iQ’s Digital Branch works best with:
Chrome | Firefox | Safari |
|
|
|
It does not work with:
Internet Explorer |
Icons made by Pixel perfect from www.flaticon.com
Please also make sure you have disabled any pop-up blockers as those will limit your ability to use some Digital Branch functions.
Welcome! If you've already had an online banking account with iQ, then you will use the same username you’ve always had—we’ve kept that the same to make it easy for you. Passwords have all been reset to a standard format and you will be prompted to provide that information when you log in the first time. Then you’ll need to reset a new password. You will also be asked to agree to the Terms and Conditions in order to access the Digital Branch the first time.
Don’t fret! If you need a helping hand, check out our handy How-to Guides. Click on the Get Started tab above and select the “Logging in for the First Time” how-to guide. That will walk you through each step of logging in for the first time.
Username: Between 8-20 characters, letter and numbers. No special characters are allowed.
Password: Minimum length is 8 characters, must contain at least one lowercase letter, one uppercase letter, one number, and special character.
After you've logged in for the first time, you may update your username and/or password by visiting the Security tab within the Settings menu, located in the drop down next to your existing username. There, you’ll be able to update your username and/or password as well as manage multi-factor authentication options.
First, enter your existing username. Then, at the bottom of the initial login page there is a link to reset the password and send a new temporary password to your phone or email. You will need to enter the following:
Username
Member number
SSN
2 of the following:
Birth Date
Zip Code
You will then be able to send a new password to your email or phone. If the password reset is not working, please contact the Credit Union to verify your information on file is accurate.
If you see an unfamiliar phone number listed when logging in for the first time, please verify your username is correct. If that does not resolve the issue, please contact our Member Contact Center.
FICO scores are a three-digit number based on information in your credit reports. In other words, it’s a summary of your credit scores from the three major credit bureaus and help lenders like iQ make decisions about how much money you can borrow and what interest rate you qualify for. You can influence these scores by paying bills on time, not carrying too much debt, and making smart credit choices.
Because we want to help you make good financial decisions and keep on track with your goals, our Digital Branch provides personalized FICO scores that are updated quarterly.
It’s easy to transfer money between iQ accounts. Visit our Making Transfers How-to Guide for step-by-step instructions.
Transfers between your accounts
During the conversion to our new Digital Branch all existing transfers between accounts you are on will transfer automatically. You will not need to re-set up these transfers.
If you want to set up new transfers between your own accounts, or accounts your uniQue identifier is attached to (for example, you want to transfer money between your primary checking account and your child’s saving account on which you are also a joint member), you simply visit the Transfers widget and select the “Classic” tab. On the ‘To Account’ drop-down, select which account you would like the transfer to go to. You can than set the amount, date and frequency of the transfer.
Transfers to or from other iQ members
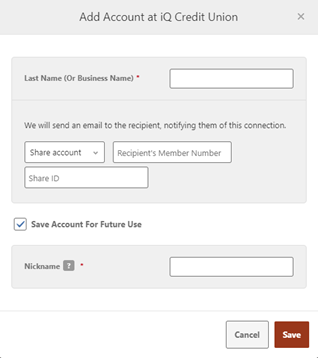
You WILL need to set up or re-set up any transfers between your account and other iQ members. These will not convert over to online banking in the new Digital Branch. For example, maybe you transfer money from your checking account to a babysitter’s checking account weekly. To re-set up this automatic or manual transfer, you will need that individual’s iQ member number and the four-digit subaccount identification number. (ex: 0080 for their checking account or 0000 for their savings) An email will be sent to the other member to notify them of the connection.
The easiest way to tell is to check your statement in online banking under Statements or on the printed copy of your statement. The name listed first is the primary account owner. Joint account owners will be listed under each share account as you view down the statement.
Why Do I Need to Know Who the Primary Account Owner is?
The new Digital Branch will allow primary account owners to see accounts associated with their uniQue identifier under a single login. For example, if you are the joint owner on your child’s or your parent’s account, then you’ll see that account listed with your other available accounts - and be able to perform transactions on it.
This change could also mean that your savings account labeled “super-secret surprise wedding anniversary trip savings account” could now be viewable by your partner.
Whether you are the primary or joint account owner may also impact your ability to view and perform certain functions within the Digital Branch.
You can pay almost any company or individual in the U.S. You can pay a company that sends you a bill, like the phone company, or a person or company you owe money to but don't necessarily receive a bill from, like your lawn mowing service. Although all payments are set up within Bill Pay, the payment can be made electronically or via a paper check if your biller isn’t set up for online payments.
You can also:
If you have specific question about Bill Pay, you can contact iQ Member Contact Center or our Bill Pay vendor directly at 866.809.9497.
All of your Bill Pay history is available in the Digital Branch but you’ll view history from prior to March 11, 2020, in a different place than history moving forward. To view your history prior to March 11, you will need to navigate to the payments tab, then “history”, then “view more”, then “display transactions”, then “history prior to 3/11/20”.
For service on any payments processed on or prior to March 10, 2020, please contact our previous vendor at 844.699.1616.
Electronic bills (eBills) are online versions of paper bills that you receive, view, and pay through Bill Pay in the Digital Branch. The eBill arrives into your Bill Pay account much like a paper bill would arrive in your physical mailbox although the format may be different. You can print eBills for your records and set reminders for yourself to pay the eBill when payment is due or set up automatic payments.
Following the conversion to iQ’s Digital Branch, you will need to reset up eBills. You will automatically be unsubscribed by your vendor and will begin receiving paper statements.
Preparedness tip: if you un-enroll about 30 days in advance you will receive a paper statement in plenty of time to have all the info you need on hand to re-subscribe right away.
To set up a transfer to another iQ member, you will need the following info:
Click the Classic Transfer tab, then “Transfer to another iQ Credit Union member.” After entering the member info for the destination account, you may save the account for later by checking “Save Account for Future Use.” Once it is saved, you will see it in the “To Accounts” for both Quick Transfers and Classic Transfers with the shared account symbol .
Quick Transfer is a convenient tool to help with processing immediate, one-time transfers. If you need to schedule a recurring transfer, schedule a transfer for a future date, or include a memo with your transfer, please use Classic Transfer.
You can add an account at another bank or credit union to your transfer list by heading to Classic Transfer and clicking “Add an external account.” A pop-up will ask you for the account and routing number and will also require a nickname to label the account in your transfer list. After the account is added it will need to be verified.
Once the account is added and confirmed, you will see it appear in both Quick and Classic transfers. You will be able to both withdraw from an iQ account to the external account and deposit from the external account into your iQ account. See the How-to Guide on transfers for step-by-step instructions.
All business account members will need to know your TIN/EIN and your member number in order to sign in for the first time. If you don't have your member number, please contact us at 360.695.3441.
In order to register as a business member, you will be required to provide your:
You will also need to provide two additional pieces of verification from several options provided.
You will be prompted for this information when you register for the first time. Keep in mind that the first person to register the account becomes the master user and then has authority to set up roles and grant new users.
Intuit product (Quicken, Quickbooks, Mint) aggregation services will be interrupted as our upgrade finalizes.
Intuit Product Users should download a QFX/QVO file no later than March 9th.
The following services will not work during the outage:
Beginning March 17, you will need to complete an account reactivation process.
After our upgrade if you need additional help, please refer to the Intuit Troubleshoot Guide.
Or download these conversion instructions:
Quickbooks Online Conversion Instructions
Quicken for Windows Conversion Instructions Express Web Connect
Quicken for Windows Conversion Instructions Web Connect
OFX Post-Conversion Troubleshooting Guide
Questions?
Phone: 877-223-4710 (Mon-Fri 5 AM to 5 PM Pacific)
QuickBooks Online (QBO) Support:
Phone: 800-488-7330
Phone: 650-250-1900
(Mon-Fri 5 AM to 5 PM Pacific)
Scanner Models Supported
• I:Deal®
•Panini®
• My Vision X™
• Vision X™
• Digital Check®
• CX30
• TS230
• TS240
Canon®
• CR-L1
• CR-50
• CR-80
• CR-120
• CR-150
• CR-135i
• CR-190i
• CR-25
• CR-55
• CR-180
• Epson®
• CaptureOne™ TMS 1000
We're sorry, iQ Online chat is available only during regular business hours, M-F 8:00am-6:00pm, excluding holidays. Please try back during these hours!
Routing Number 323383378
© 2021 iQ Credit Union
If you use links provided on this iQ Credit Union web site to third party Internet sites and services, you acknowledge that you are leaving iQ Credit Union's website and are going to a website that is not operated by the credit union. iQ Credit Union is not responsible for the content or availability of linked sites. iQ Credit Union does not represent either the third party or the member if you enter into a transaction; and privacy and security policies may differ from those practiced by the credit union.